 I found the red light was on when I turn on the oil pump switch. The power light was on when I pressed the reset button on the relay, however the motor did not run any more. The overload light was on after several seconds. After trying several times, I found the smoke from the motor, I think it's burnt:(.
BURKS OIL PUMP OVERHAUL
TROUBLESHOOT
- Overheating motor may have burnt out winding. 3 phase amps check will show unequal values on 3 lines.
- Bad noises are probably motor bearing. Replace them immediately, or motor will be ruined.
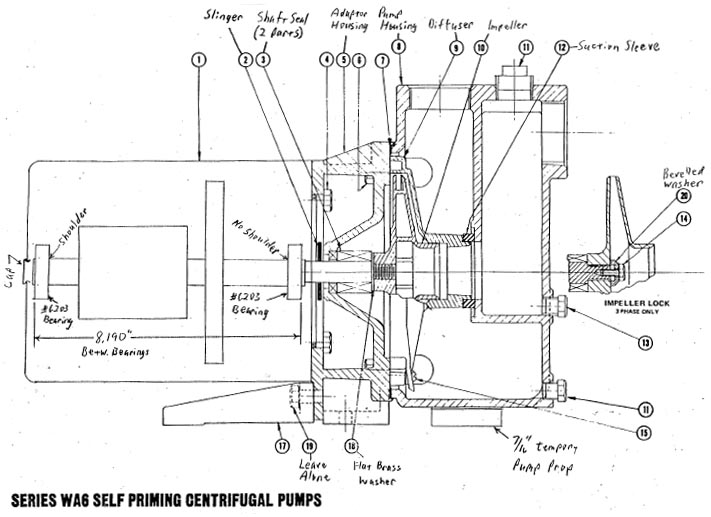
- Oil pooling in the recess within the motor adaptor (item 5) indicates a worn shaft (ok if a new seal leaks for a very short time).
- Special tools and parts are in the closet near rm 2159.
- Standards tools: 3/8” ratchet with 9/16” + 7/16”sockets, and 12” extension. One large flat - blade screwdriver. 3/16” hex key.
- Electrical: Shut off motor switch. Label Switch, “LEAVE OFF”.
- Disconnect wiring.
- Drain: Close all oil manidold valves.
- Uncork 1/2 “Poly Flow plug at top of oil manifold, for air vent.
- Tap oil into clean beaker under pump drain valve.
- Transfer oil (If clean) to drip reservoir. Repeat until drained.
- Replace Poly Flow plug.
- Push “Pump Prop” disk (in special tools box) under pump housing.
- Unbolt pump body from motor / adaptor (bell housing): (4 bolts, item 6). Don’t loosen bolts that join motor to adaptor housing. Pull motor and adaptor housing away. Some oil will gush.
Note: No left-hand threads are used on this entire pump.
- Located rubber doughnut “Suction sleeve” (Item 12) and remove it.
- Remove “Diffuser” (cone ? shaped, item 9); just 2 small screws.
- Remove O ring (Lab unit) or paper gasket (basement unit). If paper gasket is used, meticulously clean the sealing surfaces.
- Clamp special big pinch clamp around bronze impeller, with the stud sticking through a housing hole.
- Unscrew impeller clamp bolt and brass beveled washer.Note: If screw is socket head, it has Loctite on threads. I tapped motor shaft with wrong (Course) thread, so it needs extra grip.
- Reapply Loctite when reassembling this motor.
- Pop snap cap off motor rear.
- With large screwdriver, remove impeller by “unscrewing” motor shaft.
- Catch impeller. Note flat brass washer behind impeller. Leave special pinch clamp on impeller, for reassembly.
- Remove the 4 housing bolts, and pull off housing. You are fighting the drag of the rotary seal part that grips the shaft. If it’s really stuck, use special “motor bell puller”, with the CPI nut to protect the shaft threads.
- Press stationary seal out of adaptor housing.Note rubber “slinger” washer on shaft. It needs replacing if it does not grip the shaft.
- Begin reassembly unless motor bearing need replacement.
MOTOR BEARING OUT
Motor Dismantle:
- Pull off slinger.
- Mark motor shell and ends for alignment, if not already.
- Unscrew 4 long screws from rear of motor.
- Pull front end off, with armature.
- Pull bearing: Note: It’s not necessary to remove front bearing (long shaft end), and protect shaft end from damage.
- Use shop puller to pull bearing off. Note: There may be a loose piece, a motor bearing clamp, laying loose behind bearing. Don’t forget to reinstall it.
- In like manner, remove rear bearing. Note: If damage to rear bearing is no concern, you may omit adaptor.
NEW BEARING IN
Note: Details of pressing techniques are not discussed here. One caution: Work with shaft only. Do not support or press armature body or fan.
- Clean long shaft of any rubber seal residue.Press bearing onto armature shaft short end, all the way to shoulder.
- Slip front bearing clamp (a piece of the motor), if used, onto long shaft end. Using “motor bearing installer”, press bearing onto armature shaft end, but stop when bearings measure an outside separation distance of 8.190”.
- Reassemble Motor as you took it apart. If long screws are stubborn, remove screws, sight through holes and give ends corrective rotational taps.
Note: It is reasonable to assume that a seal that has little wear and soft rubber parts should work fine if carefully dismantled, cleaned, silicone ? greased, and reassembled.
- Reinstall slinger washer, nominal 1/8” from motor face.
- Use steel wools and acetone to clean the seal recess in the adaptor housing.
- Press the stationary part of the seal into the adaptor housing, rubber lit first, using “stationary seal installer”, with the cardboard disk as a protector for the ceramic face. Even, straight, firm hand pressure is enough.
- Dab some silicone oil on the ceramic seal face.
- Grease motor shaft.
- Bolt adaptor housing onto motor.
- With the steady pressure, push spring ? loaded part of seal onto shaft, graphite first; don’t turn. Push all the way, only from the spring. As per disassembly, reinstall flat brass on shaft, then Impeller (snugly), special brass beveled washer, and shaft bolt (Loctite, only if ? - 20 threads).
- Remove impeller clamp tool.
- Replace motor rear snap cap.
- Reinstall diffuser.
- Grease and install new paper gasket or # 2- 263 O ring, as req.
- Reinstall suction sleeve on end of diffuser.
- Bolt motor adaptor to pump housing, keeping flanges evenly gapped.
- Retrieve 7/16” pump prop.
- Reconnect wiring.
- Set valves for full oil flow.
- Waite 10 minutes for oil to flood the pump.
- Remove “LEAVE OFF” label.
- Turn on pump.
No comments:
Post a Comment